The estimate is sitting on the kitchen counter. It has a number at the bottom you’ve already read three times, and above it, a list of words nobody explained: containment. Negative air. HEPA filtration. Remove and dispose. Post-remediation evaluation.
So you haven’t signed it. Not because of the price, exactly, but because you don’t know what you’d be saying yes to. Will there be a hole in the wall? Will a crew in white suits be in your basement for a week? Do the kids need to sleep at Grandma’s?
Fair questions. Here’s the honest answer: mold remediation isn’t cleaning. It’s controlled removal, done inside a sealed work area with the air flowing in one direction. Once you understand why each step exists, the estimate starts to make sense.
This is the same process our crews follow in Greater Chicagoland and the St. Louis Metro. Here’s what happens, in order, and what you’ll actually see.
The Mold Remediation Process at a Glance
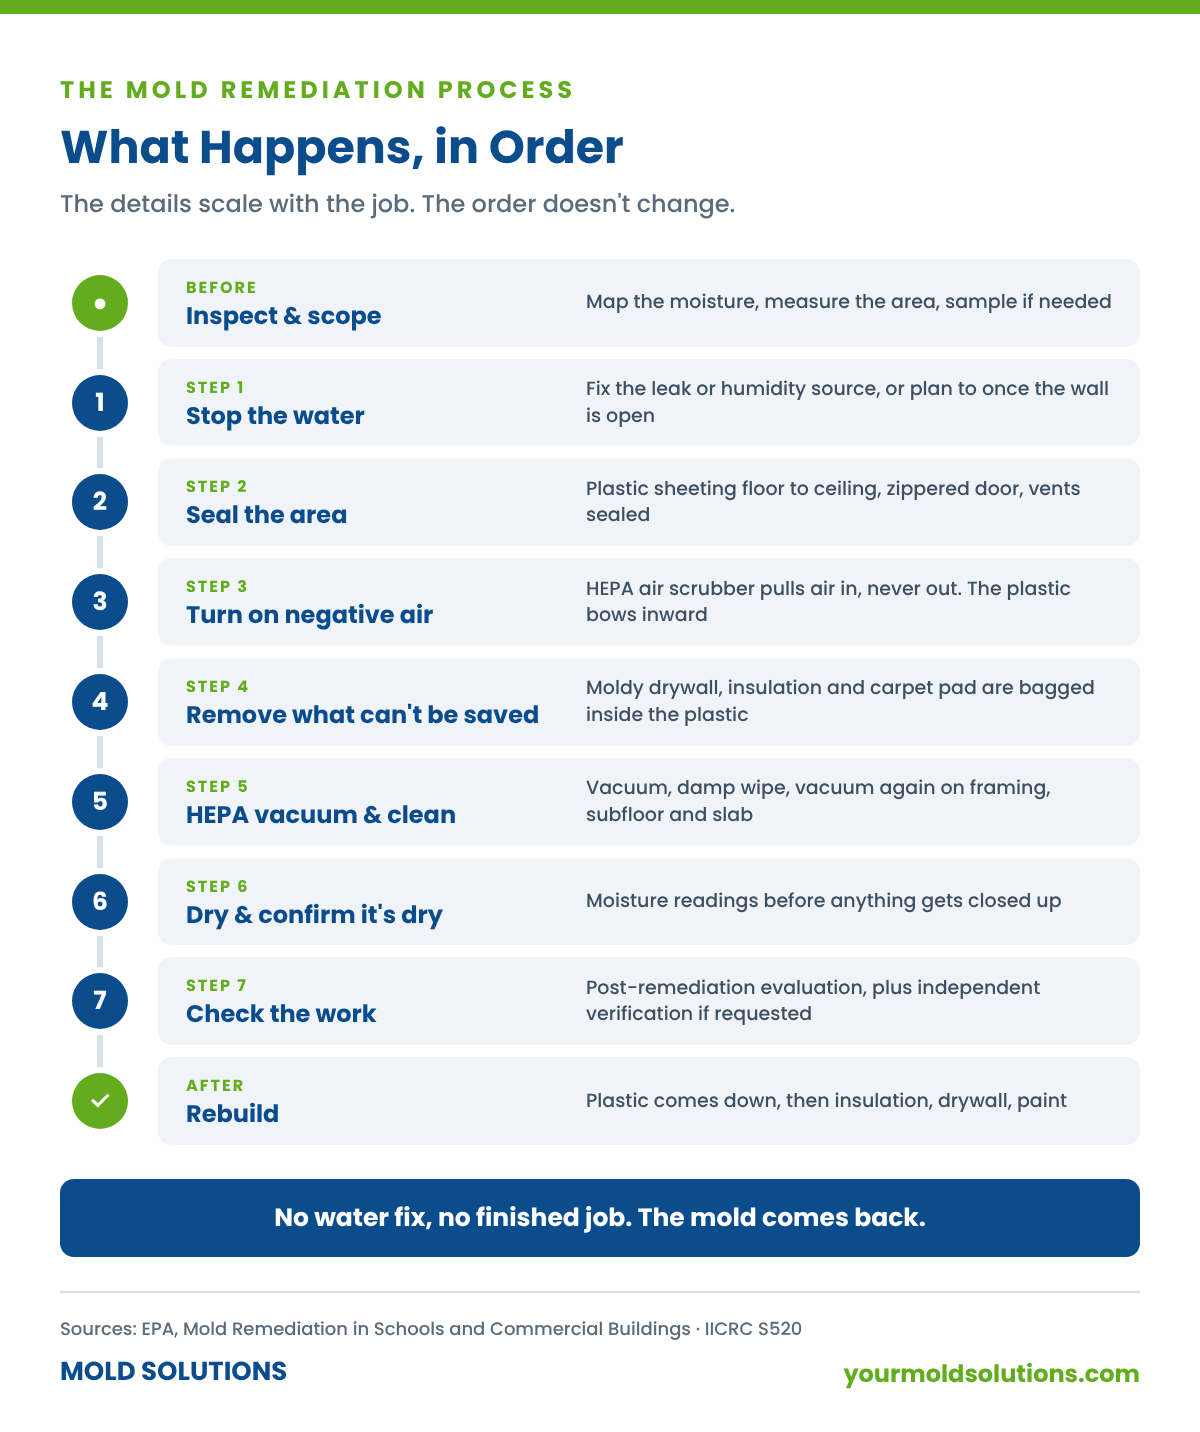
Every legitimate remediation job, big or small, follows the same basic order: find the water, seal the area, control the air, remove what can’t be saved, clean what’s left, dry everything, and then check the work before anything gets rebuilt. The details scale with the size of the problem. The order doesn’t change.
Before Anyone Picks Up a Tool: Inspection and Scope
The first visit is about two questions: where is the mold, and where is the water coming from?
A good inspection maps the moisture, not just the stain. That usually means moisture meters and infrared imaging to see how far the wet area runs behind the surface, and sometimes sampling analyzed by an accredited third-party lab. (A store-bought kit can’t tell you this. Here’s why a mold test kit can mislead you.)
The industry standard for this work, the IICRC S520, sorts areas into three conditions:
- Condition 1: normal. The kind of background mold you’d find in any home.
- Condition 2: settled spores and fragments that drifted from somewhere else.
- Condition 3: actual mold growth.
The whole job is about getting Condition 2 and 3 areas back to Condition 1.
Size matters too. The EPA’s guidance draws lines at roughly 10 square feet (about a 3-by-3 patch) and 100 square feet. Under 10, a careful homeowner can usually handle it. Between 10 and 100, the EPA calls for at least limited containment. Over 100, or anywhere mold could spread through the house during the work, it calls for full containment. Those thresholds are a big reason two estimates for “mold in the basement” can look so different. Our guide to what mold remediation actually costs walks through the rest.
Step 1: Stop the Water
If the water isn’t fixed, the mold comes back. Every time.
That might mean a plumber for a slow drain leak, a roofer for a flashing problem, regrading or a sump issue for a damp foundation wall, or simply getting humidity under control. The EPA is clear that a remediation can’t be considered finished until the water or moisture problem is completely fixed.
Sometimes the fix happens before remediation. Sometimes, when the leak is inside the wall, it happens once the wall is open. Either way, it’s on the plan from day one.
Step 2: Set Up Containment
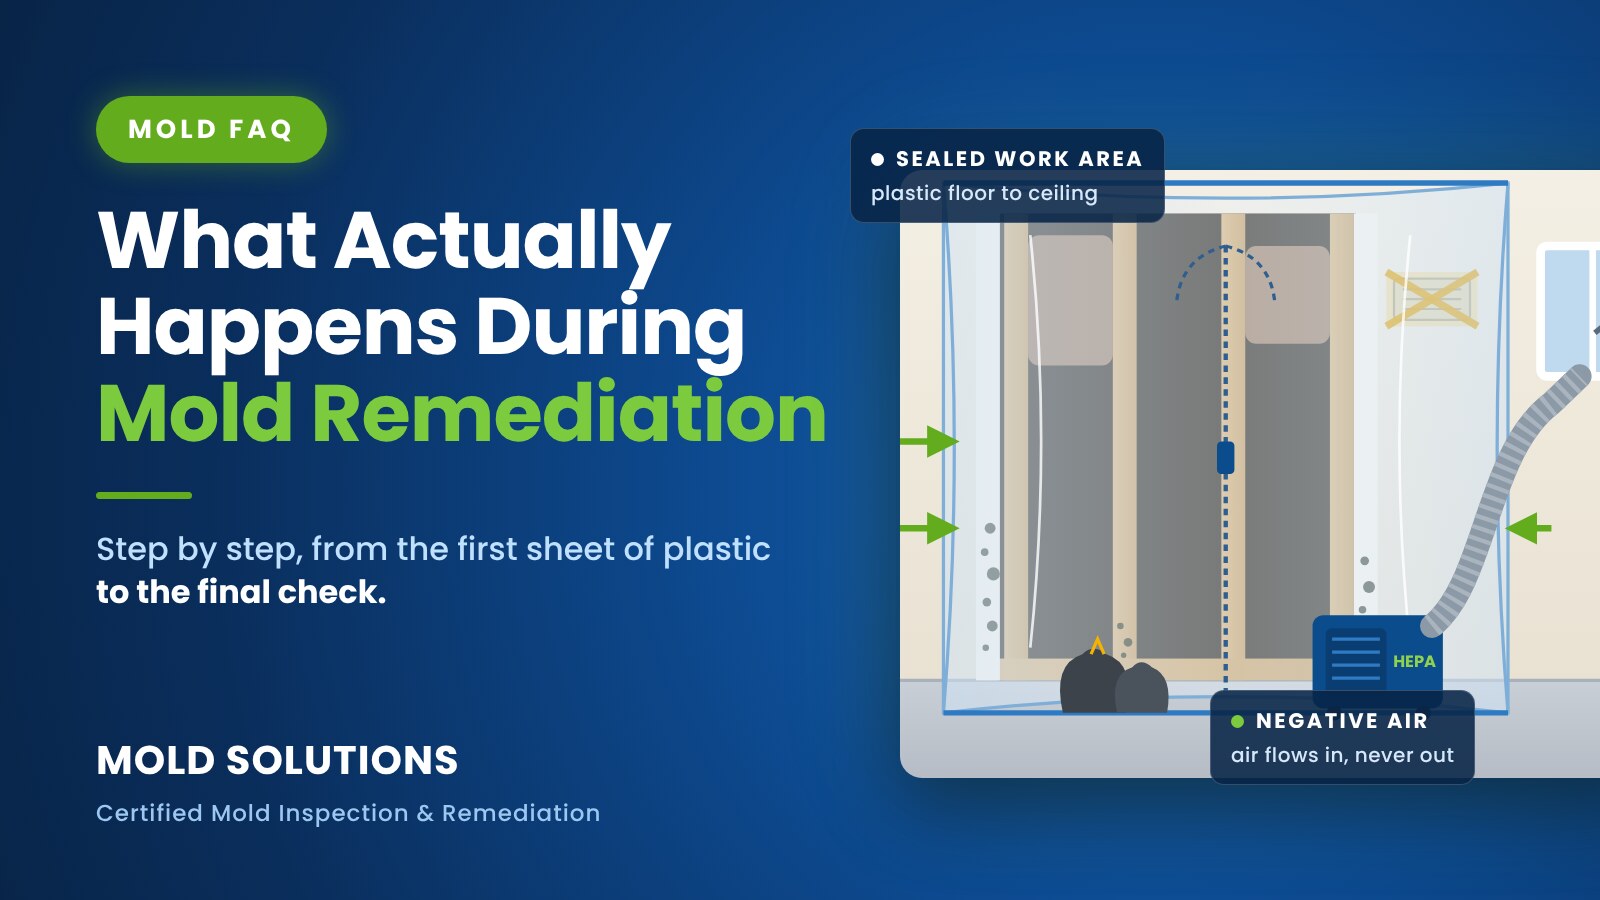
This is the part that surprises people most. Before anything moldy gets touched, the crew builds a sealed room around it.
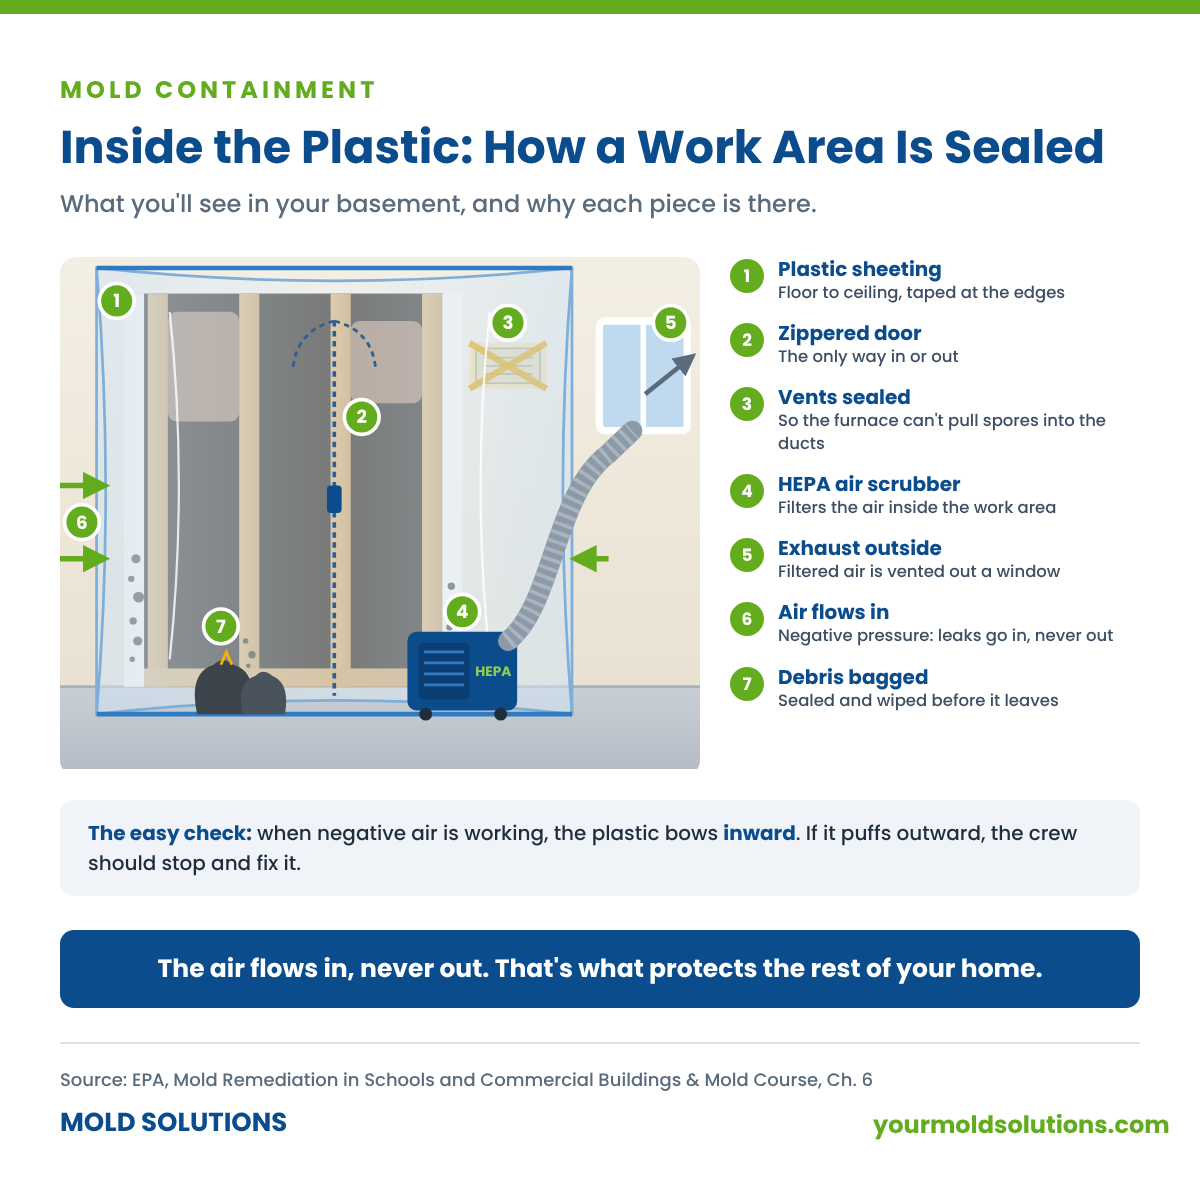
Mold containment is a barrier of heavy polyethylene sheeting, usually floor to ceiling, around the work area. Entry is through a zippered or flapped door. Heating and cooling vents inside the area get sealed so the system can’t pull spores into the ductwork.
The EPA describes two levels:
- Limited containment: a single layer of sheeting around the affected area. Typical for roughly 10 to 100 square feet.
- Full containment: a double layer of sheeting with an airlock, a small chamber where workers and bagged debris pass through on the way out. Used for larger areas or where heavy dust and spores are likely.
From the outside, it looks like a plastic room in the middle of your basement. That’s the point. Whatever happens inside stays inside.
Step 3: Turn On Negative Air
Containment alone isn’t enough, because cutting out moldy drywall puts spores and dust in the air. So the crew sets up a HEPA-filtered air filtration device (often called an air scrubber) that pulls air out of the containment, through the filter, and usually exhausts it outside.
That creates negative air pressure: slightly lower pressure inside the containment than in the rest of the house. If there’s any gap in the plastic, air leaks in, never out.
You can actually see this working. According to the EPA, when negative pressure is right, the sheeting billows inward. If it ever puffs outward, the crew stops and fixes it before going on.
Step 4: Remove What Can’t Be Saved
Now the moldy material comes out. This is where “mold behind drywall” stops being a mystery.
What usually comes out (porous materials):
- Drywall and plaster with growth on or in it
- Insulation, carpet pad and ceiling tile
- Cardboard, paper and other soft contents that got wet
What can usually be cleaned and kept (hard or semi-porous materials):
- Wood framing, joists and subfloor, when the growth is on the surface and the wood is structurally sound
- Concrete, block and foundation walls
- Metal, glass and other non-porous surfaces
The EPA’s guidance follows the same logic: drywall with mold growth is HEPA-vacuumed and removed, while wood surfaces in small and medium areas can generally be cleaned. Porous materials give mold somewhere to grow into, not just onto, which is why spraying them rarely works. (That’s the whole story behind does vinegar kill mold, and why moldy insulation usually can’t be cleaned.)
Removed material is bagged inside the containment, sealed, and wiped down before it leaves, so it doesn’t drag spores through the house on the way to the dumpster.
One honest warning: when a wall opens, it sometimes shows more than the surface did. Growth that was invisible from the room can run along the back of the drywall or up a stud bay. The EPA’s guidance is that when hidden mold turns up, the plan gets revised to cover the real area. A good contractor will stop, show you, and explain what changed before going further.
Step 5: HEPA Vacuum and Detail Cleaning
With the damaged material out, the crew cleans everything that’s staying: framing, subfloor, slab, and the inside surfaces of the containment.
That’s usually a cycle of HEPA vacuuming, damp wiping and HEPA vacuuming again. Wood that has surface growth gets cleaned until it’s free of visible mold. The air filtration device keeps running the whole time, scrubbing what gets stirred up.
This is the slow, unglamorous part of the job, and it’s the part that matters most. Dead mold is still allergenic, so the goal isn’t to “kill” what’s left. It’s to physically remove it.
Step 6: Dry It and Confirm It’s Dry
Nothing gets closed up wet. The crew confirms with a moisture meter that framing and other materials are dry, and uses dehumidifiers or air movers if they aren’t. Sealing a damp stud bay behind new drywall is how a remediation turns into a repeat job.
This is also when humidity in the space should be under control. The EPA recommends keeping indoor relative humidity below 60%, ideally between 30% and 50%.
Step 7: Check the Work Before It’s Rebuilt
Before the plastic comes down, someone has to confirm the job is actually done. There are two different checks, and it’s worth knowing the difference:
- Post-remediation evaluation is the remediator’s own quality check: a visual inspection for remaining growth or dust, moisture readings, and often sampling.
- Post-remediation verification is an independent check by an indoor environmental professional (IEP) who isn’t connected to the remediation company. The IICRC S520 says that when verification is done, it’s preferable for that professional to be independent.
What counts as “done”? The EPA’s checklist is a good plain-English version: the water problem is completely fixed, there’s no visible mold and no moldy odor, and people can use the space without health complaints. The EPA also admits that, ultimately, it’s a judgment call, which is exactly why a written evaluation and a clean set of photos matter.
If an estimate promises “100% mold removal,” be skeptical. Mold spores are in all outdoor and indoor air. The goal is a normal environment, not a sterile one.
Step 8: Containment Comes Down, Rebuild Begins
Once the area passes, the containment comes down and the space is ready to rebuild: new insulation, new drywall, paint, flooring. Rebuild comes after the area has been checked, never before. If anyone wants to hang new drywall before the work has been evaluated, ask why.
How Long Does Mold Remediation Take?
It depends on the job, and any contractor who quotes you a time without seeing the space is guessing. Here’s what actually drives the timeline:
- The size of the area. Limited containment around one wall is a different job than full containment across a finished basement.
- What’s affected. Surface growth on concrete cleans up faster than mold inside drywall, insulation and subfloor.
- What turns up behind the walls. Hidden growth can expand the scope once things are opened up.
- Drying time. Wet framing has to dry before it’s closed, and that can’t be rushed.
- The HVAC system. If ducts or the air handler are involved, the system is part of the job.
- The final check. Lab turnaround or scheduling an independent verification adds time between “work done” and “ready to rebuild.”
- The rebuild. Drywall, paint and flooring come after, on their own schedule.
Ask for a written scope that spells out containment, removal, cleaning, drying and how the work will be checked. A clear scope is the best predictor of a clear timeline.
Do I Need to Leave My House During Mold Remediation?
For most contained residential jobs, no. Containment and negative air are what make that possible: they keep the work area sealed off from the rest of the house while you go about your life on the other side of the plastic.
There are good reasons to plan to be somewhere else for some or all of the job, though:
- The work area is a room you can’t live without, like the only bathroom, the kitchen or a bedroom
- The HVAC system is involved. The EPA says not to run a system you suspect is contaminated, which can mean no heat or air for a stretch
- It’s a large job with full containment across a big part of the house
- Someone at home has asthma, allergies or a weakened immune system, or there’s a new baby. The EPA recommends talking with a health professional if you have health concerns
A few things that help before the crew arrives:
- Clear a path from the door to the work area, and move belongings out of the zone if you can
- Plan for pets to stay out of the way, and out of the work area entirely
- Don’t scrub, spray or paint the moldy area first. It spreads spores and destroys the evidence of how far it goes
- If you suspect the HVAC system is involved, leave it off until it’s been checked (here’s how to tell when the furnace smell is mold)
What a Good Remediation Estimate Should Include
You don’t need to become an expert. You just need to know what a complete scope looks like. Before you sign, check that the estimate:
- Names the moisture source and says who is fixing it
- Describes the containment and the negative air setup, for anything over about 10 square feet
- Lists what’s being removed and what’s being cleaned in place
- Explains how the work will be checked at the end, and by whom
- Doesn’t promise the impossible, like “100% mold removal” or a fix that skips the water
Red flags: no containment on a sizable job, a plan that’s mostly spraying or fogging, nothing about the water, or pressure to rebuild before anything is checked.
When to Call a Pro (and What We’ll Actually Do)
Mold is a remediation job, not a cleaning job, when it covers more than about 10 square feet, keeps coming back, is inside drywall, insulation or subfloor, follows a flood or long-running leak, shows up in the HVAC system, or you smell it but can’t find it.
At Mold Solutions, our IICRC-certified teams in Greater Chicagoland and the St. Louis Metro run the same process described here:
- Find the moisture source with moisture mapping and infrared imaging, so the water gets fixed by the right trade
- Contain and control the air so the rest of your home stays out of it
- Remove, clean and dry what’s affected, and document every step
- Check the work before anything gets closed up, and walk you through what we found
And if your problem turns out to be a small spot on a hard surface, we’ll tell you to grab a scrub brush. Not sure which one you have? Take our 2-minute mold assessment.
Chicagoland: Call 815-469-8877
St. Louis: Call 314-993-6653
Or schedule your inspection online, and turn that estimate on the counter into a plan you understand.
Further reading: What Mold Remediation Actually Costs in Chicagoland and St. Louis · Does Vinegar Kill Mold? What Actually Works
Sources: EPA — Mold Remediation in Schools and Commercial Buildings · EPA — Mold Course, Chapter 6: Containment and PPE · EPA — Mold Course, Chapter 7: Evaluating the Remediation · EPA — A Brief Guide to Mold, Moisture and Your Home · IICRC — S520 Standard for Professional Mold Remediation